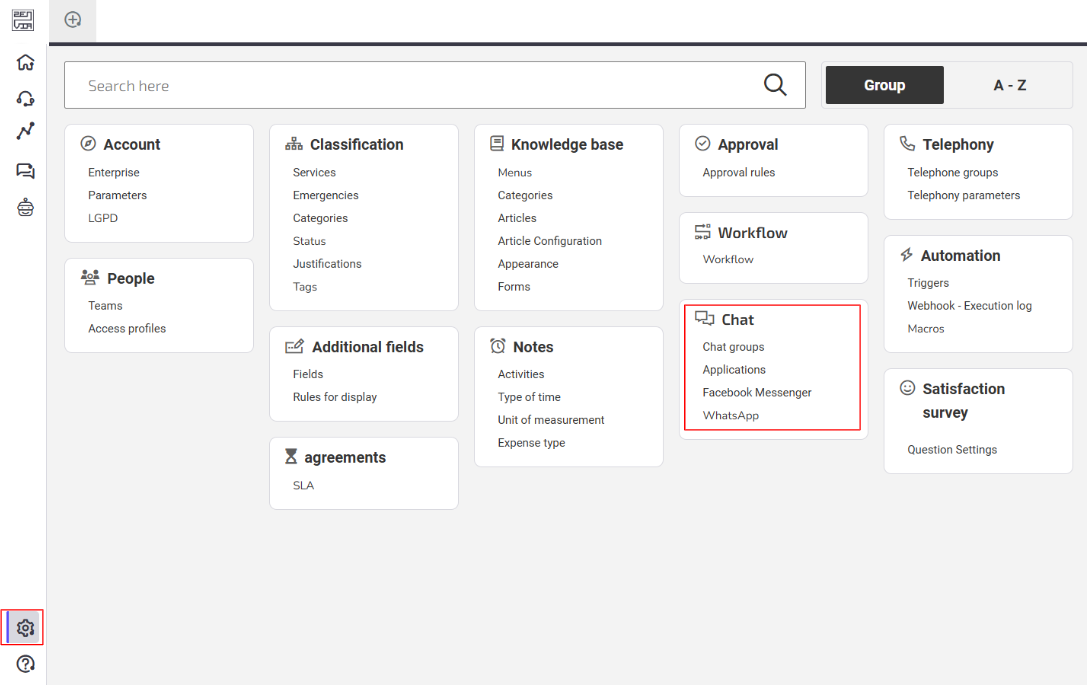
The Chat Settings allow you to centralize communication with customers across multiple channels, such as Facebook Messenger and WhatsApp, as well as configure chat groups and support apps.
This article guides you on configuring channels to optimize the customer experience and support efficiency, exploring features that make support fast and integrated.
⚠️Attention: Functionality available only for Operator and Admin profiles.
Chat Settings
To configure the features, go to: Support > Settings > Chat.
Chat groups organize the support teams, directing customer conversations to the correct departments or teams based on the type of request or service.
With chat groups, you can:
Organize the team by products, services, or areas;
Define which agents respond to each type of request;
Automate the distribution of conversations;
Customize automated messages to enhance the customer experience.
How to create chat groups
1. Go to Support > Settings > Chat > Chat Groups;
2. Click on New;
3. Choose the Name of the group;
⚠️Attention: The group name must be unique on the platform.
4. Enter the Display Name;
💡Tip: Optional, but visible in the chat app. The display name can be the same for different groups.
5. Enable, if necessary, compatibility with WhatsApp Business / Facebook Messenger / NLU.
⚠️Attention: Some settings will be disabled when enabling this option to ensure compatibility.
6. In Service Selection, define if the customer will be able to choose the desired service:
- Do not display;
- Display, but do not require the information;
- Display and require the information.
💡Tip: This setting allows the customer to select the service in the support chat.
7. In Default messages, set up automatic messages for different moments: entering the queue, starting and finishing the service;
💡Tip: Use { to access dynamic variables and personalize with the text editor.
8. In Inactive closure, enable it to set the time after which the chat will be automatically closed;
9. In Automatic distribution, enable it to allow the system to distribute chats among the agents in the group.
10. In Administrators, choose who can monitor the group conversations;
11. In Agents, select the agents who will attend the requests;
12. Click on Save.
Done! Chat group created successfully.
The chat apps are plugins that you can install on your website so that customers can contact the support team.
How to create an App
1. Go to Support > Settings > Chat > Apps;
2. Click on New;
3. Enter the Name;
4. Enter a Description;
5. Choose the application type:
- Chat: allows new conversations between customer and agent;
- Knowledge Base: allows article search;
- Chat + Knowledge Base: allows conversations and searches.
💡Tip : If you choose the Knowledge Base, refer to the article Knowledge Base Configuration .
6 . In Appearance Settings , customize the title, welcome message, logo, colors, icon, position, and chat height;
7 . In Application Code , get the key to include the chat on the website.
💡Tip : Ask a web designer for help to insert the code between the <body> </body> tags.
9 . In Integrations , install the "Movidesk Chat App" plugin in the WordPress plugin list and insert the key.
10 . In Settings , configure chat display preferences;
11 . Choose to enable or disable Working hours ;
⚠️Attention : Disabled, the chat is transferred whenever an agent is online. Enabled, the service will respect the configured hours.
12 . Select the Holidays to be observed;
13 . Choose the Chat Groups that will be available in the app;
14 . Save the information.
Done! App created successfully.
13 . Choose the Chat Groups that will be available in the app;
14 . Save the information.
Done! Application created successfully.
💡Tip: To make the chat group appear in Messenger options, enable the compatibility parameter in Chat > Chat Groups. Select the desired group and check the option Enable compatibility with WhatsApp Business Movidesk/Facebook Messenger.
Connect and configure Facebook Messenger
1. Access Settings > Facebook Messenger;
2. Log in with your username and password;
3. Select the group you want to associate with Movidesk Messenger;
⚠️Attention: the integration must be renewed every 90 days, when the Facebook password is changed, or when the page remains inactive for more than 90 days.
4. Enable all permission options in Facebook Messenger;
5. Save the information.
Done! Facebook Messenger has been successfully integrated.
To use WhatsApp as a support channel, you need to request the module, have an approved number by WhatsApp (Meta), and sign a contract with Zenvia.
A member of our support team will be responsible for your account and will assist with the backoffice configuration of WhatsApp in Zenvia Customer Cloud.
💡Tip: To make the chat group appear in WhatsApp options, activate the compatibility parameter in Chat > Chat Groups. Select the desired group and check the option Enable compatibility with WhatsApp Business Movidesk/Facebook Messenger.
Set up Support through WhatsApp
To set up service through WhatsApp Business Movidesk, follow these steps:
1. Link the phone number to a chat group compatible with WhatsApp-based service;
2. Access the WhatsApp panel at Settings > Chat > WhatsApp;
3. In the Number field, select the desired phone if you have more than one contracted number;
4. In Chat Group, click the edit button. A list of chat groups compatible with WhatsApp will be displayed;
5. Select the group responsible for the service.
Done! Configuration completed successfully.
💡Tip: Each WhatsApp number must have only one chat group associated. Messages sent to numbers without linked groups will not be received and will be lost in the system.


