Important: The Click to WhatsApp campaign integration feature is currently in beta. To use it, please contact the Zenvia team and request activation for your account.
If you're running Click to WhatsApp (CTWA) campaigns on the Meta platform, you can integrate them directly with your Zenvia Customer Cloud (ZCC) chatbots. This functionality allows you to choose the ideal chatbot for each campaign without needing to create manual conditions in your flows.
In this article, you will learn:
How to create a chatbot for CTWA campaigns
How to link a chatbot to a Meta campaign
What is Click to WhatsApp?
Click to WhatsApp (CTWA) is a type of Meta campaign that allows people to start a conversation with your business directly via WhatsApp by clicking on an ad.
With this feature, you can link each CTWA campaign to a specific chatbot in your Zenvia Customer Cloud account, directly through the Meta platform. This integration eliminates the need to configure manual conditions within your flows to identify where the contact originated, as the association is done automatically, simply and efficiently.
This gives you even more advantages when using dedicated chatbots for each campaign. In addition to avoiding changes to more complex main flows, it facilitates organization, reuse, and individual measurement of results per campaign.
Prerequisites
Before setting up the integration, check the following points:
Your WhatsApp number is active in Zenvia Customer Cloud.
The chatbot you want to use is published.
The chatbot has the "Enable campaigns for this chatbot" option activated.
It is necessary to configure a welcome message (mandatory).
Configure an initial response option. You can choose between up to 3 quick replies (quick response buttons) or 1 autofill, which appears automatically pre-filled in the text box when the customer clicks on the ad and WhatsApp opens.
Examples of Use
Black Friday Campaign: Create a chatbot just to answer questions about promotions and stock.
Online Courses: Link a different chatbot for each course offered.
Campaigns by Country: Use one chatbot in Portuguese for Brazil and another in Spanish for campaigns in Latin America.
How to Create a Chatbot for CTWA Campaigns
For CTWA campaigns, it's ideal to create a dedicated chatbot for each temporary campaign, such as Black Friday actions, product launches, or promotional events. This ensures a simpler, more objective flow that's easy to discard or reuse in the future.
Attention: If the chatbot already has an active campaign, you must deactivate that campaign in the Meta Ads platform before updating it. After deactivation, it will be possible to update the active campaign in the chatbot builder. If the campaign is not deactivated, an error will be displayed when attempting to save the campaign changes.
See how to create a chatbot for CTWA campaigns:
1.Access Zenvia Customer Cloud.
2.Click on Chatbot > Chatbot List > Create new chatbot.
3.Click Select on the Flow chatbot option.
4.Give the chatbot a name that identifies the campaign (e.g., "July 2025 Promotion").
5.Create a flow focused on the campaign's needs: promotions, product information, directing to customer service, etc. In the article Creating a conversational flow from scratch, you'll find a detailed tutorial on how to design the bot's structure in the Builder.
Once the conversational flow is structured, follow these steps:
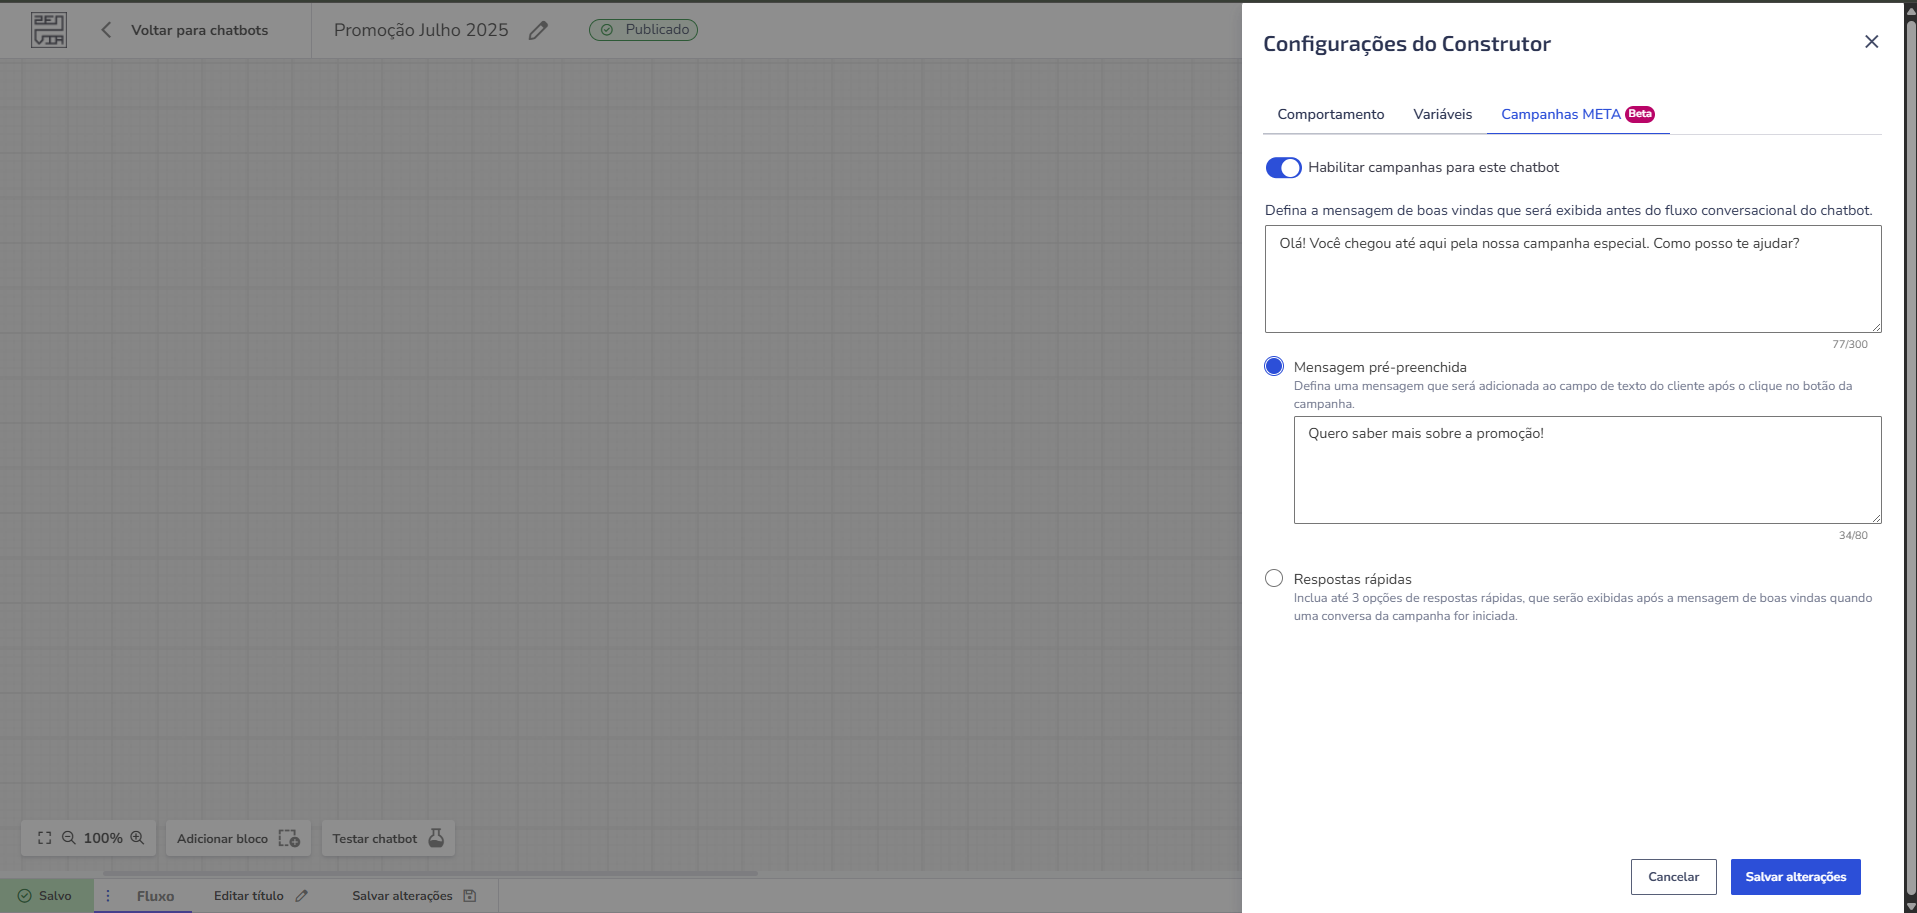
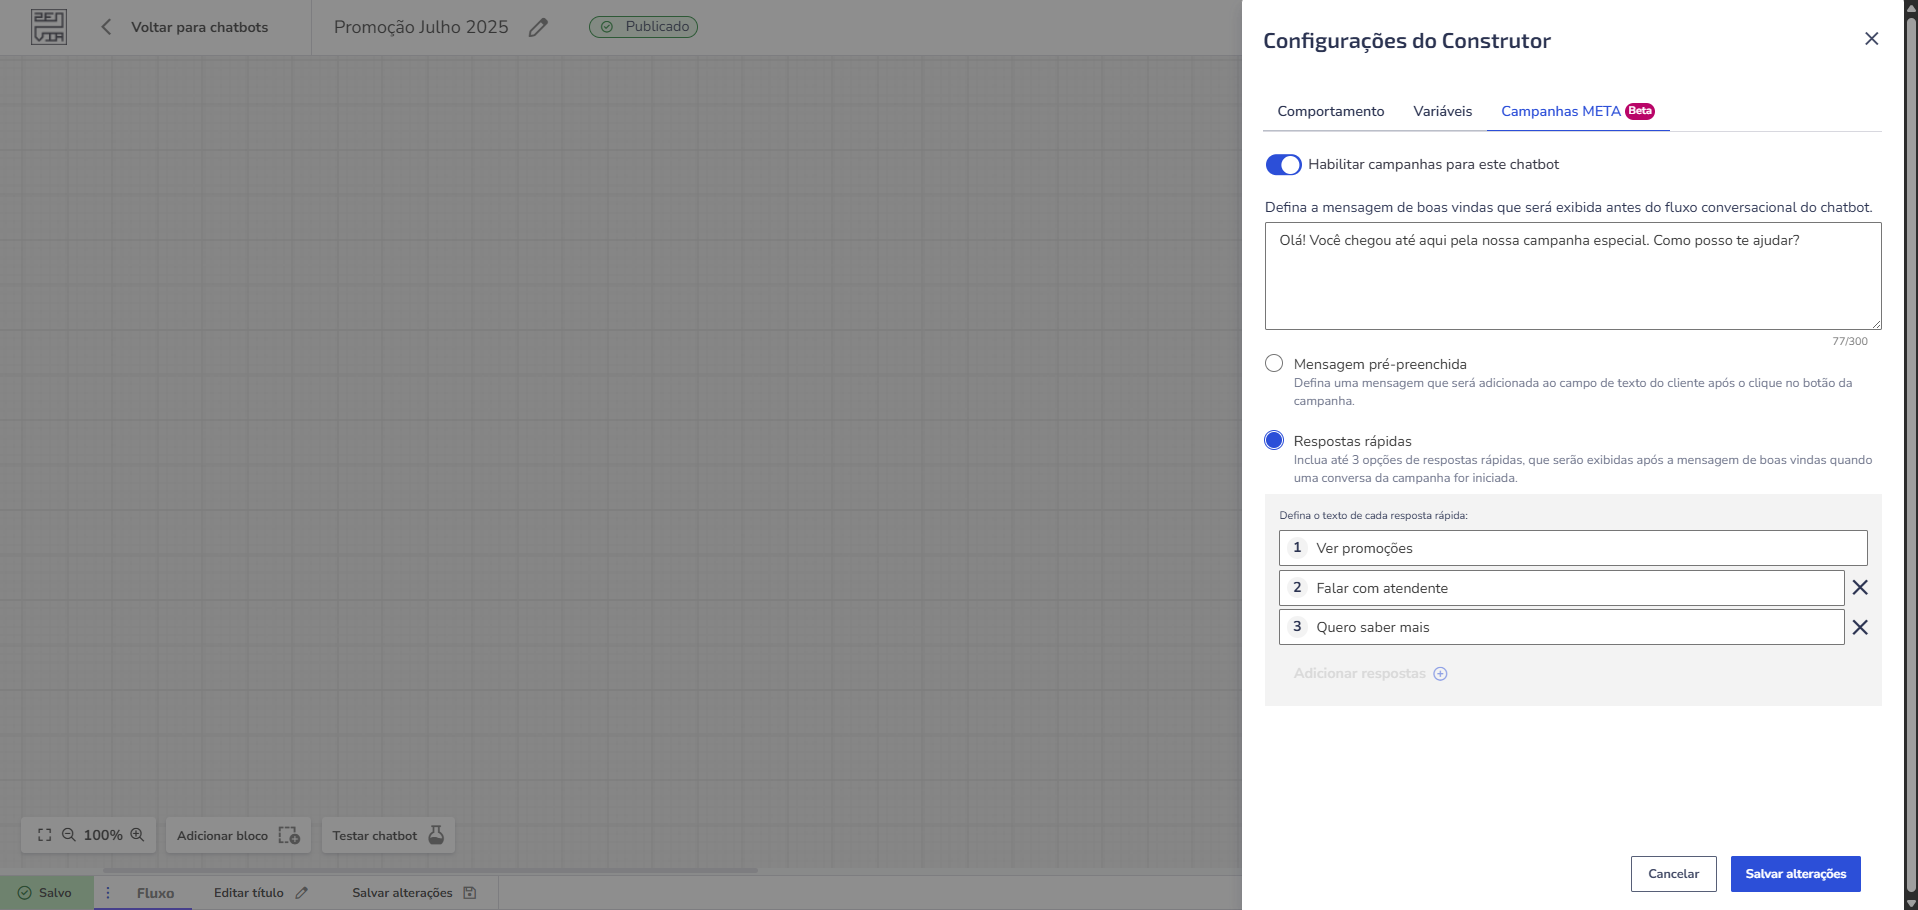
In the chatbot settings menu, access the META Campaigns tab and activate the Enable campaigns for this chatbot option. This activation is mandatory for the chatbot to be available in Meta's selection list during campaign creation.
Configure the welcome message, which will be automatically sent when the user clicks on the campaign ad. Example: "Hello! You've reached us through our special campaign. How can I help you?"
Next, choose the type of initial response you want to configure. You must select one of the options below:
3.1: Pre-filled message: Defines a phrase that will automatically appear in the WhatsApp text field as soon as the customer clicks on the ad, ready to be sent. Example: "I want to know more about the promotion!"
3.2: Quick replies: Configures up to 3 clickable buttons with response suggestions. Examples: "See promotions," "Talk to an agent," "I want to know more.
Important: You must configure one of the two initial response options: either a pre-filled message or quick replies.
Done! Now click Save changes > Test chatbot and see your progress so far. If everything is as expected, publish it so it's active and accessible to users. Remember that this step is part of the prerequisites for the chatbot to be linked to the campaign in Meta.
Great! Your chatbot is ready to be selected on the Meta platform when configuring the campaign. See the tutorial below.
How to Link a Chatbot to a Meta Campaign
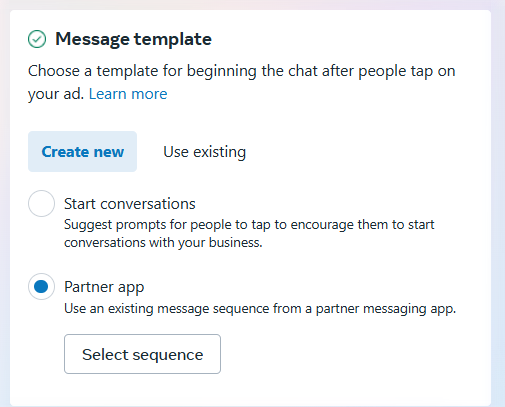
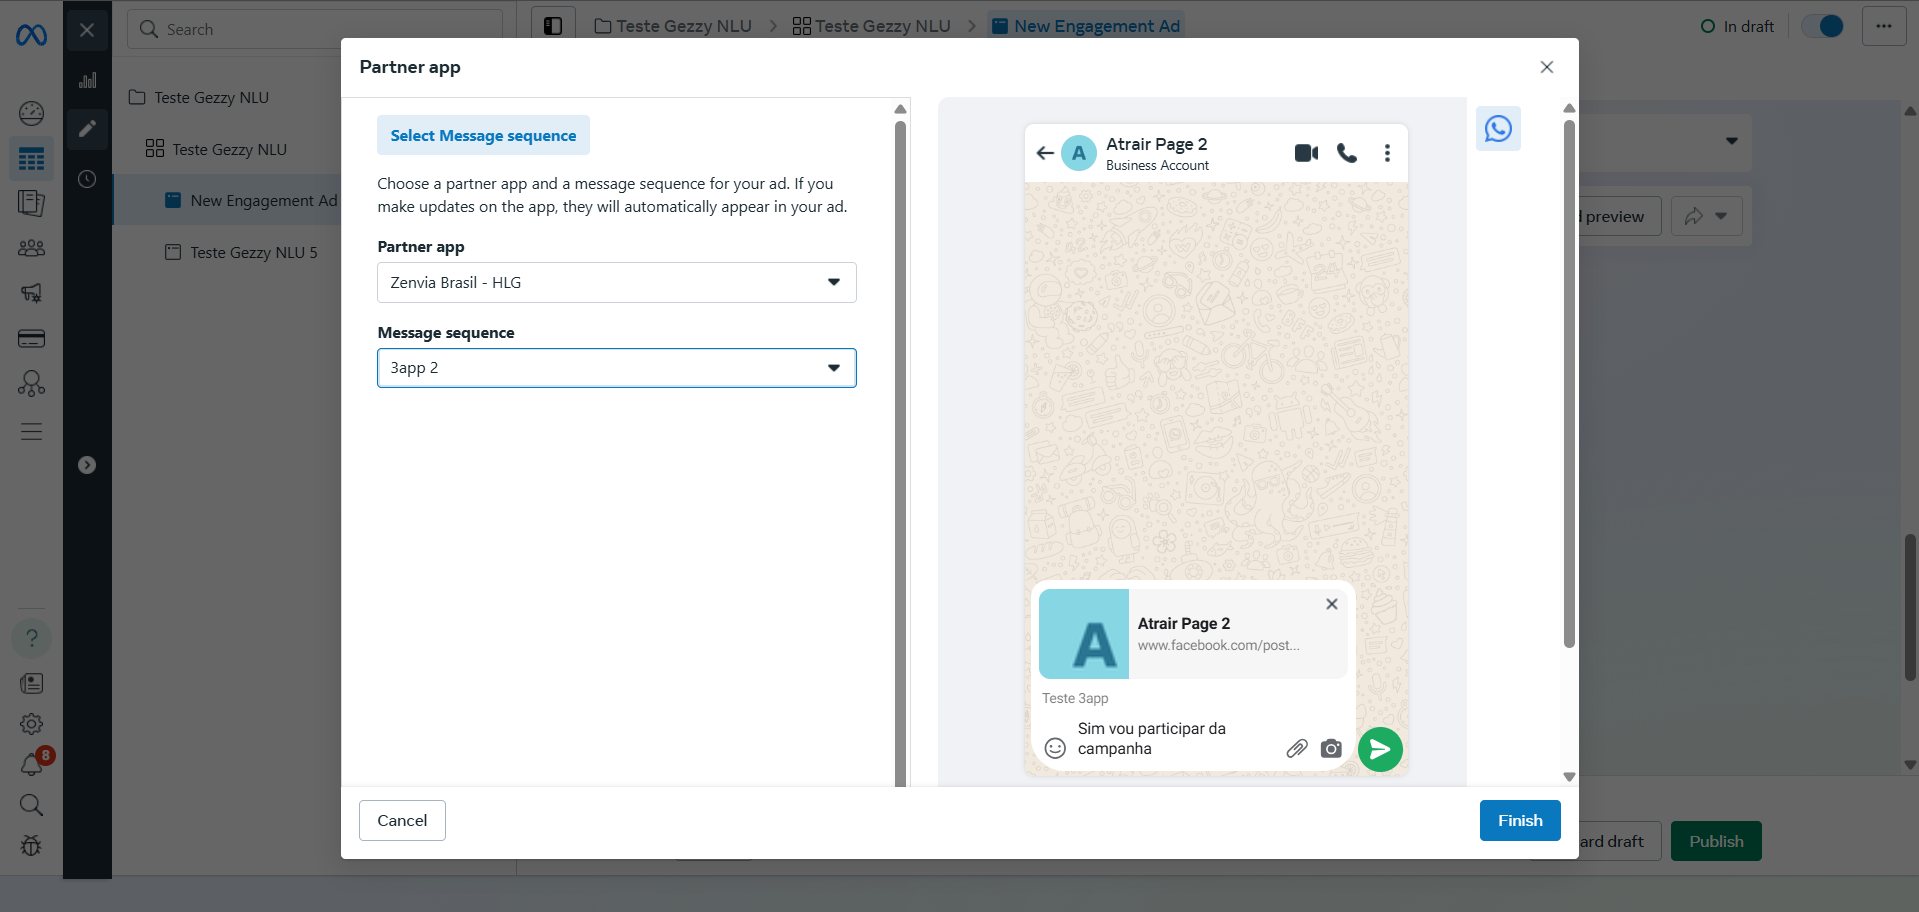
Access the Meta Ads platform and create or edit a CTWA campaign.
In the chatbot selection field, choose the published and activated chatbot from your Customer Cloud account. It will be displayed in Meta's list with the title of the welcome message you configured previously. Therefore, choose a clear and representative message for the campaign.
Finalize the campaign as usual.

Dica: Access the article Integrating Meta Ads Manager with Zenvia Customer Cloud for a complete tutorial on how to link your account to our platform. For a comprehensive tutorial, we recommend accessing Meta's article Guide to creating ads on WhatsApp Business.
What if I Want to Change the Chatbot Later?
You can edit the campaign in Meta at any time and choose another published chatbot from your Customer Cloud account. The linking update will also be automatic.
If you need help creating or publishing a chatbot, see the related articles below:


