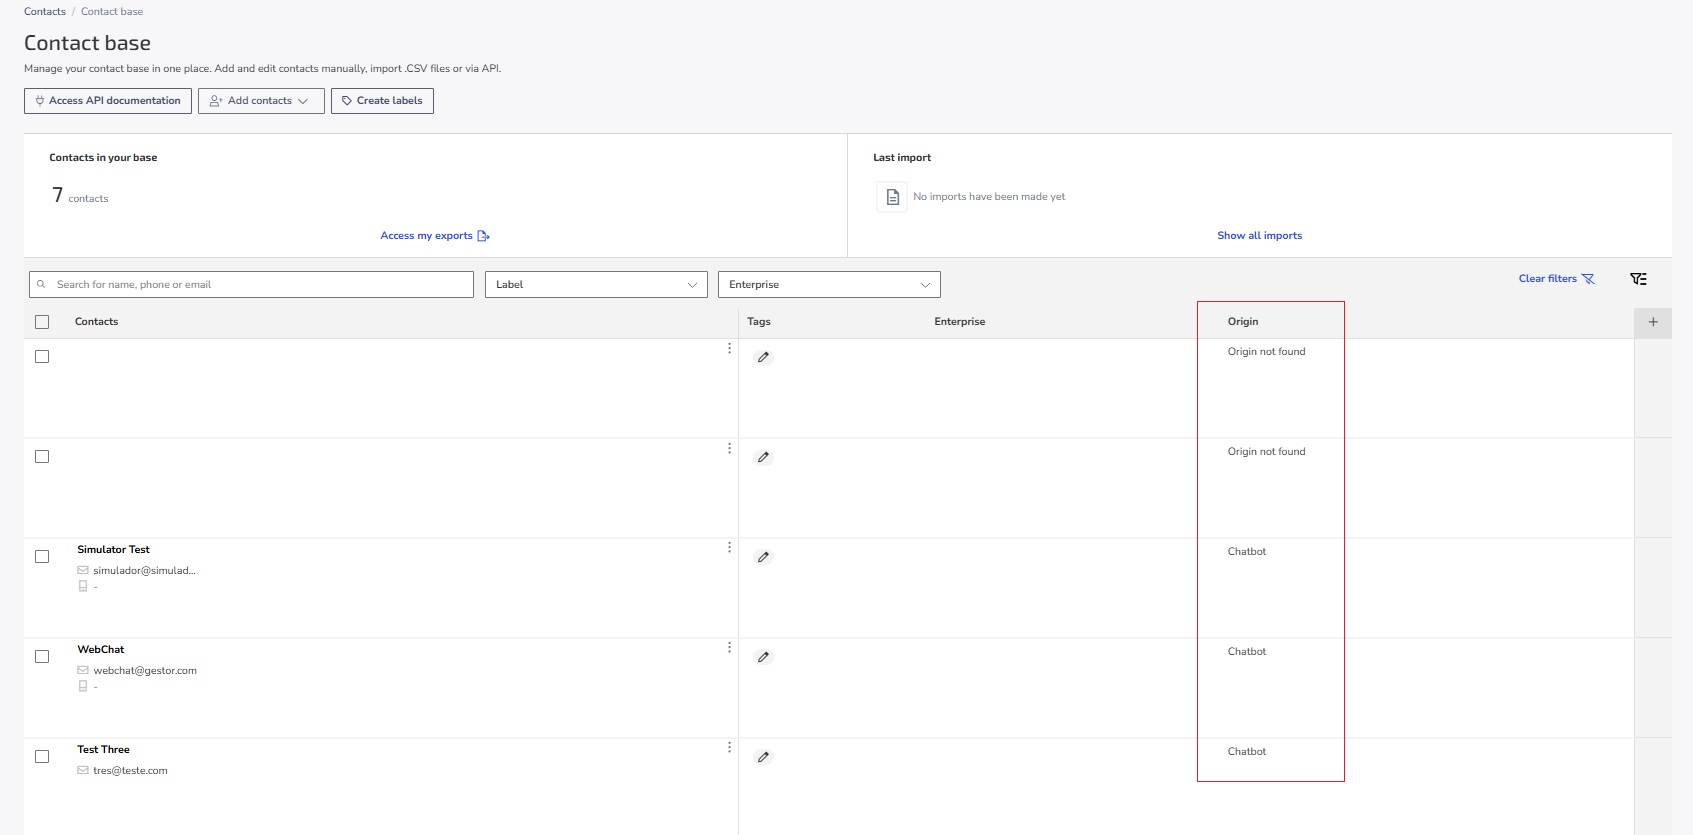
The Contact Base centralizes all your customer and lead data in one place, making it easy to access and manage in a unified way.
In this article, see how to use the main features to add, customize, and filter contacts.
Contact base features
With the Contact Base, you can:
Add contacts: Import contacts from a file or add them manually. For developers, the Zenvia Customer Cloud offers an API that allows direct integration of the contact base with your applications. Access the Zenvia API documentation for more information.
Tag contacts: Create tags to organize your contacts according to their relationship with your company.
Customize and filter contacts: Apply filters and customize columns to display only the most relevant information.
Manage contacts: Start conversations, add or edit contacts information.
How to use the contact base
Access the Contact Base:
In the sidebar, go to Contacts > Contact Base.Search for a contact
The search field allows you to find contacts using any relevant data (name, phone, email). Just type the desired term, and the results will be displayed automatically.
Customization and filters in the contact base
Toggle column and filter visibility and sort them as you prefer. There are two types of available columns:
Fixed columns: Always visible and non-removable.
Custom columns: Add and adjust columns according to your preferred filters.
💡 Tip: You can apply up to 15 simultaneous filters, in addition to using the search field to further refine your results. Filters allow you to segment specific information such as:
- Contact data (name, email, phone, etc.);
- Company (name of the organization associated with the contact);
- Address (city, state, country, etc.);
- Custom extra fields (created according to your organization's needs).
- Origin: This filter allows you to identify where each contact in your Contacts Base came from. The origin is filled in automatically based on the channel or flow used. For example, if the contact was created through a conversation with the Chatbot, the origin will be recorded as "Chatbot".
To understand contact sentiment and RFM classification, refer to:
To customize columns:
Add columns by clicking the + icon on the last column of the contact list;
Organize the column order. You can move the columns to arrange contact information in your preferred order;
Change column and filter visibility:
To show or hide a column, click the visibility icon
.
To adjust the visibility of a filter, click the icon
.
Manage contacts
In the contact base, you can:
Start conversation
In a contact’s action menu, click Start conversation to open the commercial inbox directly.
Edit contact
To update a contact’s information:Click the contact’s action menu
and select Edit contact.
After updating the information, click Save changes.
💡 Tip: When editing a contact, you can add them to other lists or remove them from existing ones.
Add contact to a list
To add a contact to another list:In the actions menu
, click Add to a list.
Select or create a new list and click Confirm.
Permanently delete a contact
To remove a contact from all lists and from your database:In the actions menu
, select Permanently delete.
Confirm the deletion by clicking Delete contact.
Execute mass actions
Bulk actions allow you to modify multiple contacts at the same time. Currently, you can delete or tag contacts in bulk.
⚠️ Attention to plan availability:
|
- Select the desired contacts:
- Check the checkboxes
next to the contacts you want to delete or tag.
- To select all visible contacts, check the first checkbox at the top of the list. To select all the contacts in your database, click Select all.
- Check the checkboxes
- Click on the desired action:
- Delete: The deletion is permanent, but won't remove the message history linked to the contacts. A confirmation window will be displayed; to proceed, click on Delete Contacts.
- Tag: Create a new tag or apply an existing one. Customize the tag's color to make it easier to identify and finalize by clicking Continue > Apply Tag. It is not possible to remove labels in bulk; the removal must be done manually, contact by contact.
Done! Now you know how to use and organize your customer base in Zenvia Customer Cloud!

