The Personality traits screen allows you to create and adjust the characteristics of your chatbot. Here, you can define the following aspects to guide its behavior:
- Purpose: Determine who the chatbot is and its main functions.
- Behavior: Establish how the chatbot should interact with users, including Language Type, Terminology, and Response Length.
- Additional rules: Choose which additional rules the chatbot should follow during the interaction with the customer.
Once all settings are defined, your chatbot will interact with customers consistently, aligned with your company's identity. For example, a bank wanting to enhance customer service can set its chatbot to be formal, professional, and trustworthy.
To start creating an efficient personalization process for your chatbot, follow these instructions:
Access: Chatbot > Chatbot List > Generative AI Chatbot. Select the chatbot you want to adjust, click its name, and go to Personality in the left-hand menu.
Define the Chatbot's Purpose
Write a detailed description of who the chatbot is in the provided field:
- Explain how it should present itself.
- Determine its objective and specify exactly what it should do.
- Optionally, include any other important information.
Define the Chatbot's Behavior
Select the behavioral aspects you want to customize and set how the chatbot should communicate with customers during conversations:
- Language: Use the slider to set the vocabulary type. The further left, the less formal the chatbot will be; the further right, the more formal it will be.
- Terminology: Decide if the chatbot should use technical terms. Ensure the terminology matches your target audience. The further right on the slider, the more technical the language will be.
- Reply size: Set the maximum number of characters for the chatbot's responses. The further right on the slider, the longer the response, which may increase the time the chatbot takes to reply.
Click Save Changes when done.

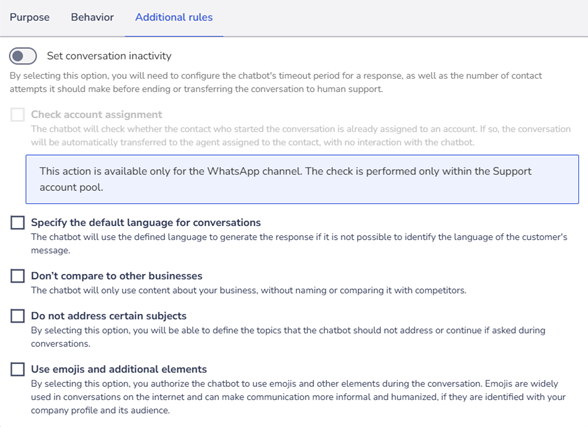
Defining additional rules for the Chatbot
Choose which additional rules the chatbot should follow during the interaction with the customer. Select the ones you want to add and click Save changes at the end.
- End conversation due to inactivity: When selecting this option, you must configure the chatbot’s waiting time for a response, as well as the number of contact attempts it should make before ending the conversation or transferring it to human support. Learn more about this configuration in the topic Generative AI Chatbot Inactivity.
- Check portfolio assignment: The portfolio assignment action is available only for the WhatsApp channel (for those who have it enabled), and also for the Commercial Service module of Zenvia Customer Cloud.
- Specify the default language for conversations: Define the language the chatbot should use by default in interactions. This setting will be applied whenever the bot cannot automatically detect the language of the customer's message. For example, if the default language is set to English and the customer sends a short message like “No”, which could belong to multiple languages, the chatbot will respond in English, following the configured default. If no language is selected, the chatbot will respond in Portuguese by default. To activate this option, check the selection box and choose the desired language.
- Avoid comparisons with other companies: The chatbot will only use content related to your company.
- Avoid certain topics: The chatbot will not address specific topics and will not continue the conversation if asked about them.
- Use emojis and additional elements: The chatbot will use emojis and other elements during the conversation, making communication more humanized and informal.
Once finished, click Save changes.
Generative AI Chatbot Inactivity
How to configure inactivity
Enable inactivity by clicking the icon and selecting Configure .
Choose the number of contact attempts (None, 1, 2, 3, or 4).
Set the waiting time, which must be between 5 minutes and 23 hours.
Define the action after the inactivity period:
4.1: End the conversation: Configure the message to be sent with each attempt if a number greater than "None" is selected.
4.2: Transfer to human support: Choose between Sales Support or Customer Support and fill in the required fields:
Sales Support: Enter the group ID and user ID.
Customer Support: Select the group or agent to handle the request.
4.3: Transfer message: Define a message to notify the user about the transfer.
Once everything is set, click Save changes.
Important: To successfully transfer the conversation to Customer Support, the client’s email is required. If the chatbot does not have this information, it will automatically ask before initiating the transfer and wait for the defined response time. If no response is received within this period, the chatbot will end the conversation.