Learn how to make the chatbot transfer a conversation to a human agent.
This transfer is useful when the chatbot can't solve everything on its own. In these cases, it's important that the conversation is passed on to a human agent to help the customer.
This guide will show you how to set up this service handover.
Step-by-step to configure the service transfer
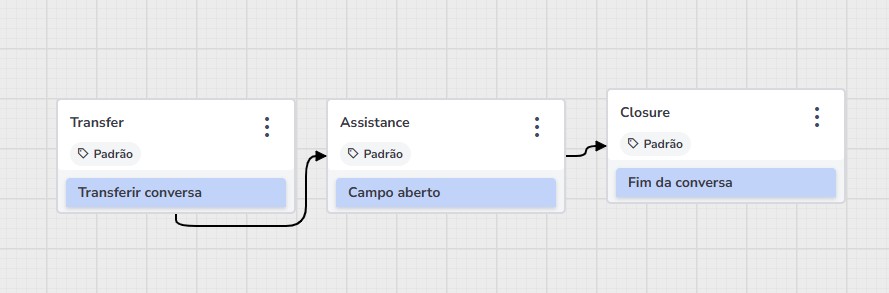
For this handover to work, you will need to create three parts (blocks) within your conversation flow:
Block 1: The transfer block: This is where you will tell the system that the conversation needs to go to a human agent.
Block 2: The service block: This is the space where the customer will talk to the human agent.
Block 3: The end of conversation block: After the agent helps, this block will end the service.
Let's see how to create each one of them.
Block 1: Creating the transfer block
Click the Add content button and look for Conversation actions. Then, click Transfer conversation.
Select the Human support option.
Defining the type of support
You’ll need to indicate where the conversation will be transferred to. The options are: Sales support or Technical support.
Sales support: the destination can be a Human agent or a Support group.
Technical support: the destination can be a Human agent or a Department.
In both cases, right below the Destination field, you must select from the dropdown menu which specific agent, group, or department will receive the conversation.
Important: In addition to assigning the line to a group, we recommend verifying the configured destination for the WhatsApp line. To do this:
Go to Settings > Channels > WhatsApp.
Locate the line being used by the bot, click the three dots (⋮), and select Assign Group.
If the destination group for the transfer is not selected here, the system will be unable to deliver the contact.
Important: This configuration screen may not be available for all profiles. Only users with Admin or Operator profiles can view and modify these settings.
 Using manual parameters (optional)
In Sales support, you also have the option to manually set the parameters. To do this, enable the Set parameters manually option and fill in the fields with:
Dynamic variables: using the syntax <?$variableName?>
Static values: directly entering the desired value.
Setting additional information in the transfer
The Email field is automatically selected and is required. This ensures that the agent will have access to the customer’s contact information.
If you want to request extra information before the transfer:
Click Add new.
Include the desired fields, for example:
Customer phone: will be displayed as <?$phone?>
Customer name: will be displayed as <?$name?>
Transfer message
Write a short message that the customer will see while the conversation is being transferred. Example: “Please wait a moment, we are transferring you to an agent.”
Block 2: Creating the service block
Create a new block and name it "Service."
Click on "Add content," then on "Data input," and choose "Open field." This field is where the customer will talk to the human agent.
After creating this block, go back to the "Transfer service" block. In the "Destinations" section, choose the "Service" block. This means that after the transfer message, the conversation will go to this block.
Block 3: Creating the end of conversation block
Create the last block and call it "Closing."
Click on "Add content," then on "Conversation actions," and choose "End of conversation."
Write a thank you message, such as: "Thank you for contacting us!"
After creating this block, go back to the "Service" block. In the "Destination" section, choose the "Closing" block. This way, after the agent finishes the support, the conversation will go to this final message.
Done! Now you know how to make the chatbot hand over the service to a real person.
Useful information
How to know if the transfer was successful or not
One way to see if the transfer is working well is to observe what happens with the finalization message.
If you have set up a finalization message (in Block 3), it should only appear after the human agent has finished helping the customer.
When your chatbot is working for customers, do a test and see if the conversation is correctly going to a human agent when needed (in sales service).
After the conversation reaches the agent, it should stay with them until they finish the service. Only after that should the conversation return to the chatbot flow.
If the conversation returns to the chatbot before the agent finishes, this may mean that the transfer is not configured correctly.
It is important that the agent finishes the service before the conversation returns to the chatbot, so that the customer has an uninterrupted experience.
If this happens (the conversation returns to the chatbot ahead of time), there may have been a problem with the transfer, such as a failure in the connection with the service group.
Keep an eye on these signs to discover and solve problems quickly, so that the customer experience is the best possible.
What to do if the transfer doesn't work
If you notice that the transfer isn't working as it should, try these solutions:
See if there are agents available Confirm if there is anyone available in the service group you are trying to transfer the conversation to. If no one is online, the customer will be waiting in a queue. You can change the settings for when agents are available or create a waiting queue so that the customer doesn't go straight back to the chatbot.
Check the connection settings with other systems Verify if the way the chatbot platform is connected to the human service system is correct. This includes information such as access codes (API) and the service group ID.
Transfers to groups with WhatsApp
It is important to know that it is only possible to transfer conversations to service groups that have access to WhatsApp. Check if the group you want to transfer the conversation to has permission to receive messages via WhatsApp and if everything is configured correctly.
Need help with Zenvia Customer Cloud?
If you follow the instructions in this article and still have difficulties or questions related to Zenvia Customer Cloud, please contact our Support team directly. Check the step-by-step guide in the article: How to contact Zenvia Technical Support.